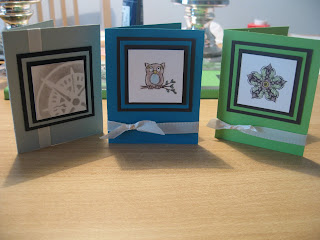
I love making cards more than I like to scrapbook but if I have to come up with an idea on the spot it can take me up to 2 hours to finish a card which means that by the end of the evening I often feel totally frustrated and vow never to make a card again! So I've deceided to come up with (or find online) a few simple card layouts that I can reuse for any occasion to make my life easier:)
Today I want to show you one that I came up with, it's very simple and I'm sure other people have made this card before I'm just saying I didn't find this card idea online :)

Today I want to show you one that I came up with, it's very simple and I'm sure other people have made this card before I'm just saying I didn't find this card idea online :)
Supplies you'll need:
*Card base measures 8cmX10cm (for this card I used green)
*the layered card stock pieces measure (in inches this time, if you have a paper trimmer it usually shows cm and inches anyway):
1. cream colored card stock 1 3/4 x 1 3/4 inches
2. brown card stock 2 x 2 inches
3. green card stock (or some color as base of card) 2 1/4 x 2 1/4 inches
4. brown card stock 2 1/2 x 2 1/2 inches
*You'll need a stamp that fits on the smallest square (cream card stock)
*Brown ink if you are using brown for your layers
*chalks or pencils to color in the stamped image
*adhesive (I use photo stickers because they are cheaper than anything else here and they work great
*a piece of coordinating ribbon
* a bone folder to fold your card nicely
I always start by cutting all the pieces of card stock that I need before I do anything else. Then I take my cream colored card stock and stamp my image on it. I like clear stamps because they are easier to position (although I must admit I stamped the image a first time and had to start over on the other side of the card stock). I like to use my chalks to color in the image with a Q-tip.
Once I've colored my stamped image I layer all the squares, I like to use dimensionals on the cream card stock but then for the other layers I just use my photo stickers.
When all the layers are stuck together just position them on your folded card base. At this point I cut a slit in the crease of my card base for the ribbon to go through.
Tie a knot or a bow and you're done! If this were a baby card you could stamp a stroller to the front or a cupcake for a birthday. The first card in this last picture is a boy card so I didn't tie a knot this time.

Tip: Most of my stamps are from the brand Inkadinkado, they usually cost about 10 euros but I found a seller on ebay.nl (netherlands) who sells clear stamps ( mostly inkadinkado) for 5 euros!! and he only charges 3 euros shipping (within Europe) if you ask her to group your items. Her ebay name is Chardali and she speaks English if you need to send her a message!
Tip: Most of my stamps are from the brand Inkadinkado, they usually cost about 10 euros but I found a seller on ebay.nl (netherlands) who sells clear stamps ( mostly inkadinkado) for 5 euros!! and he only charges 3 euros shipping (within Europe) if you ask her to group your items. Her ebay name is Chardali and she speaks English if you need to send her a message!
No comments:
Post a Comment