Saturday, February 19, 2011

Toes!

I absolutely love baby toes so when I saw this tutorial on How Does She I knew I had to go out and take pictures of my kids feet to display them in our home:)
It is really simple to do, just buy a plane wooden frame at a hobby store (I got mine at Vima in France), use mod podge to glue some scrapbook paper on the wood (I didn't even paint the wood this time either). Then stick on your vinyl and drill two holes in the top to pass some ribbon through and attach a handle you've either bought or made!
Oh, and I finally found those metal handles I was looking for a while back for my laundry sign and they were super cheap too!

The wall still looks a little bare with just that sign so I'll have to come up with something to add to it so my little sign doesn't go unnoticed;)

Friday, February 18, 2011

Finding inspiration

One of the great things about the area we live in is all the little towns that have historic town centers. A week ago we went to a town that lies right on the border between Switzerland and Germany. When you walk through the town there is a bridge that takes you across the border. We started on the German side and everything was picture worthy:)

This is the bridge, I was on the Swiss side when I took this picture of the German part of the town.

I loved the mix of colors all over the place!
Back on the German side we walked past an antic store, here's a piece of furniture the owner was working on, with a nice coat of paint it would look great!

I couldn't leave the antic store without one of these! I have a plans for this baby as soon as I can get the materials I need.

Friday, February 11, 2011

Pillow stencil

Apparently stencils are in at the moment! I found these great canvas pillows for 2.50 euros the other day (3.50 dollars) and just couldn't resist, so I got three to replace my old pillows on our couches. I wanted to try stenciling so I thought I'd put our initials on one of the pillows. Of course this week my daughter was sick and then I got sick so I didn't have time to go to the store and pick up some fabric paint and since I am very impatient I just decided to use plain acrylic paint seeing how well it stays on my clothes when I get clumsy while I'm painting.

I started out by cutting my image out of vinyl with my silhouette and I just transferred the image to my pillow case.

I went around all the letters and numbers with a pencil


Then I covered a hardback book with a plastic bag to protect it and I put it inside the pillow case so the paint wouldn't go through to the other side of the case and so that I had a sturdy surface to paint on.
Once the paint was dry I attached tassels to the four corners with a yarn needle.
And I tied a knot inside the pillow case for each tassel.
My husband doesn't like the tassels and I think I'll get tired of them soon but I can easily remove them so I'm not worried:) I like how it turned out though...for now!

living room reveal...good bye canvases

A few months back I made this family sign after seeing it on a blog called Dittle Dattle she has a tutorial on how to make this so I wont be doing one here. Up until two days ago I didn't have anything over the sign because I wanted to have canvas pictures of our family, I was going to transfer the images on the canvases myself, sadly the process only worked once...and I ruined a few canvases whilst trying.


Then last week I stumbled on these great wooden frames for which I only paid 5 euros (about 7 dollars)!! They were on sale, originally priced at 26 euros for the three frames so I bought two sets. I didn't like the black because my sign is green and brown...and I'm very much into green at the moment.
So I painted them a nice guacamole color:)

And I sanded the edges so the black could stick out a bit, I then added some brown ribbon on the back!

Here's the finished look of our living room wall, in my previous post I mentioned the canvases that used to be where I now have the painting..I can't believe I hadn't noticed how perfect it was for that wall, instead I had it in the dining room and there was a huge lack of color over there. Finally starting to like our living room/dining room area...I can walk into the room without my head spinning:)


From awful...to not so great...to finally!


About 4 months ago I had decided I wanted to have some canvas art in my home and because I was impatient I decided I would paint on them myself (freehand) instead of stenciling or using fabric or paper (too expensive). What an awful mistake that was, I am definitely not a painter, so here is my lame attempt at some cherry tree blossoms:


I know...dreadful...I can't believe I had that in my living room for over a month, at the time I was just happy to have something filling up the empty space.
So almost 2 months later I bought some nice wallpaper and covered my doodles and added a third canvas, it was better and at first I thought it was awesome...probably because I was glad I didn't have to look at my poor old cherry tree anymore. But then 3 days ago i noticed that the wallpaper on my canvases just didn't match the rest of the decor in the living room..so it had to go. I took off the wallpaper and started painting my canvases...first a nice coat of black to hide the branches and then a green color that I thought I wanted...but I was not happy with the result
so I kept going over it, trying to add some blue into the green...
and it just kept getting worse and worse..
Finally after finding a bucket of paint with the picture of a turquoise wooden box I felt inspired! My living room and dining room area is either blue or green depending on the wall...so a mix of both was perfect!
I painted two canvases turquoise and one in an off white paint I'd forgotten I had.
Then I downloaded an image from the silhouette library (it took me over 3 hours to decide on the right image). This time I knew I was not going to paint, so I just blew up the image to the size I wanted and then I cut it into several parts to fit them on the silhouette carrier sheets. I then had the silhouette cut it out on vinyl. All I had to do then was assemble the pieces and stick them on the canvases.
Oh and there are four birds, the two bigger ones represent the parents and the two smaller ones represent our kids.


I love how it turned out...and instead of hanging it up in my living room area I put it all up in the dining room which was in desperate need of some color..and all along I had the perfect framed image to put in my living room instead of the canvases...but that is for my next post!

Linking to:


Sunday, February 6, 2011

A simple card for any occasion

I love making cards more than I like to scrapbook but if I have to come up with an idea on the spot it can take me up to 2 hours to finish a card which means that by the end of the evening I often feel totally frustrated and vow never to make a card again! So I've deceided to come up with (or find online) a few simple card layouts that I can reuse for any occasion to make my life easier:)
Today I want to show you one that I came up with, it's very simple and I'm sure other people have made this card before I'm just saying I didn't find this card idea online :)

Supplies you'll need:
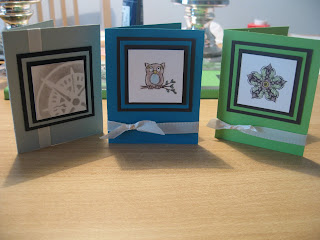
*Card base measures 8cmX10cm (for this card I used green)
*the layered card stock pieces measure (in inches this time, if you have a paper trimmer it usually shows cm and inches anyway):
1. cream colored card stock 1 3/4 x 1 3/4 inches
2. brown card stock 2 x 2 inches
3. green card stock (or some color as base of card) 2 1/4 x 2 1/4 inches
4. brown card stock 2 1/2 x 2 1/2 inches
*You'll need a stamp that fits on the smallest square (cream card stock)
*Brown ink if you are using brown for your layers
*chalks or pencils to color in the stamped image
*adhesive (I use photo stickers because they are cheaper than anything else here and they work great
*a piece of coordinating ribbon
* a bone folder to fold your card nicely

I always start by cutting all the pieces of card stock that I need before I do anything else. Then I take my cream colored card stock and stamp my image on it. I like clear stamps because they are easier to position (although I must admit I stamped the image a first time and had to start over on the other side of the card stock). I like to use my chalks to color in the image with a Q-tip.
Once I've colored my stamped image I layer all the squares, I like to use dimensionals on the cream card stock but then for the other layers I just use my photo stickers.
When all the layers are stuck together just position them on your folded card base. At this point I cut a slit in the crease of my card base for the ribbon to go through.

Put your ribbon through the slit and bring it over to the front of the card.
Tie a knot or a bow and you're done! If this were a baby card you could stamp a stroller to the front or a cupcake for a birthday. The first card in this last picture is a boy card so I didn't tie a knot this time.


Tip: Most of my stamps are from the brand Inkadinkado, they usually cost about 10 euros but I found a seller on ebay.nl (netherlands) who sells clear stamps ( mostly inkadinkado) for 5 euros!! and he only charges 3 euros shipping (within Europe) if you ask her to group your items. Her ebay name is Chardali and she speaks English if you need to send her a message!

Saturday, February 5, 2011

I was featured!

Great way to start the week end, my valentine floating frame was featured on Totally tutorials! It's a great website where you can find lots of easy tutorials, at the moment everything is valentine's day related so go check it out for some great ideas!

Totally Tutorials Blog

Friday, February 4, 2011

First Link party

I've joined my first link party!!OH and I'm taking a little break while I'm visiting my family!

Tuesday, February 1, 2011

faux 'antique' handle

So to make a handle for your laundry sign...or any other sign that might need a handle, here's what you'll need: Fabric flowers with a thick stem that have a wire inside of them so you can twist them into any shape you like. I got mine at IKEA for 50 cents if I'm not mistaken!

And some dark gray wire, you could use pliers too but I couldn't find mine and I managed very well without them:)
Start by removing the flower from the stem and start twisting the wire around the stem, I went across twice and the first time I tried to make it bulky by not twisting it tightly around the stem. then when you go across the second time make sure to fill in any holes where the green stem might be showing!
The ends aren't completely covered on mine but it didn't bother me, I'm sure you could cover them up better if you wanted to.
With this one I tried to add extra wire to the ends to make them look round but because I was too eager I didn't get both sides even.

So to finish my laundry sign I asked my husband to drill two holes on the top front of my sign and I stringed some ribbons into them and tied my handle to the sign with the ribbon. Voila! super cheap project but I finally have something nice to look at when I walk past my laundry baskets:)